

Website Security: Better At Preventing Than Treating
Better To Prevent Than To Treat, This Sentence we often hear in some media. So is the case with websites. Website is one of the technology products that facilitate many people, be it for a business, organization, or personal interests. There are many positive things you can do using the website.
Unfortunately, as mentioned earlier, technological developments also have consequences, including websites. Irresponsible people see the development of the website as an opportunity to commit crimes online.
The fact that a lot of crime happens on the internet doesn’t mean you need to stop developing websites. The good news is there are many things you can do to
protect your website from cybercrime attacks.
This article will guide you to create powerful and effective protection to secure your website from online crime attacks.
Preventing is better than cure, isn’t it?
Let’s learn to secure your WordPress website in 25 steps!
Why Is Website Security Important?
Even though online crime attacks are real, there are still some website owners who underestimate this. They also do not provide more protection for their website.
As a result, when a website is attacked by malware or hacking, there are not much you can do.
To increase your knowledge of website security and increase your vigilance, we will discuss five reasons why website security is important first.
a. Security Threats Continue to Increase
WordPress as the world’s largest website creation platform is a soft target for hackers. According to Sucuri’s research, of all cases of online attacks in 2017, 83 percent of them attacked WordPress. The figure increased from a year earlier to just 74 percent.
The above facts are certainly a stern warning for all WordPress website owners to improve their website protection. However, there’s no need to worry as this review will guide you through securing WordPress in a plenary manner!
b. Increasingly Sophisticated Online Attacks
Malware makers and hackers always improve the quality of their attacks. The more days, the more sophisticated the attacks they create. Therefore, you should always update the protection of your website.
c. Your Business Reputation Is At Stake
In recent years consumer privacy data has become a hot topic. Data theft concerns make consumers more cautious when transacting online. This certainly demands business owners to improve the security quality of their websites.
d. Unsafe Websites Potentially Blacklisted
Not only do you keep your website’s reputation in front of your customers, but also google it. Google as the largest search engine in the world can put your website on the blacklist if it proves to be an unsafe website.
Based on Sucuri data, as many as 17 percent of infected websites were blacklisted by Google in 2017.
e. Preventing Is Better Than Treating
Website protection does require a long and laborious process. However, it is better to go through such a long process than to lose if the website is attacked. The disadvantages of online crime include not only material but also issues of reputation and trust of customers and website visitors.
In essence, website security is not something you can trivialize. For that, you need to learn how to secure a powerful and effective WordPress website. Well, this article will learn all things about website security.
Securing Login Access
There are 25 steps to securing a WordPress website divided into four parts, namely Securing Login Access, Keeping WordPress Installation Secure, Securing Files and Databases, to Bonus Security Tips.
Come on, start your first step of securing the website!
1. Create a Custom Login URL
When you first install WordPress, the default administrator login link is wwww.yourdomain.com/wp-login.php. This default link certainly makes it easy for hackers to get into your WordPress dashboard.
You need to change the WordPress admin login link to a link that no one else knows easily. How do I do this? It’s pretty easy. You can change the WordPress admin login link using the plugin’s help.
You can use the free plugin Custom Login URL. Install and activate the Custom Login URL plugin via the WordPress dashboard. Once the activation is complete, go to Settings > Permalink and you will see the settings as below screenshot shown:
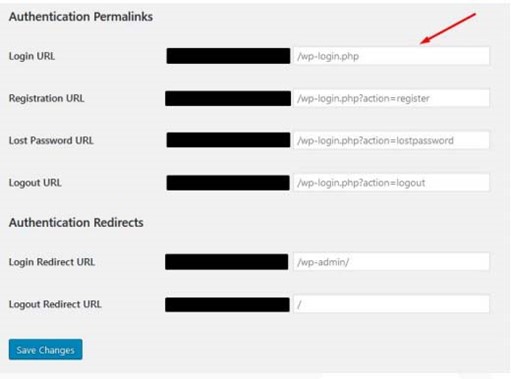
In the Login URL field, you can change /wp-login.php to any link you want. For example, you can change it to /admin-website. Create a unique login URL that only you know to be more secure.
2. Change Admin Default Username
Not only the login URL you need to replace, but also the WordPress admin username. By default, the WordPress admin username is admin. If you’re still using that username, it’s a good idea to quickly change it because it’s easy to guess.
How to change the default admin username is quite easy, namely through the Users menu in the WordPress dashboard. You just need to create a new username, here are the steps:
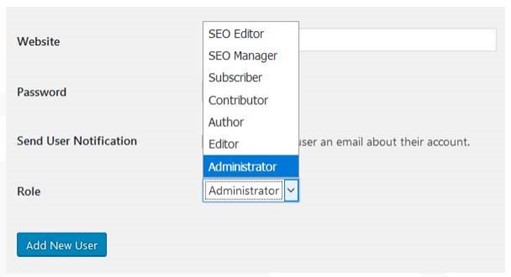
- Open the WordPress dashboard and click the Users menu > Add New
- Create a unique username, do not use the admin like the previous default username.
Note: You must use a different email address than your previous username
- Give the same permission role as the previous default username, namely Administrator. Then click Add New User
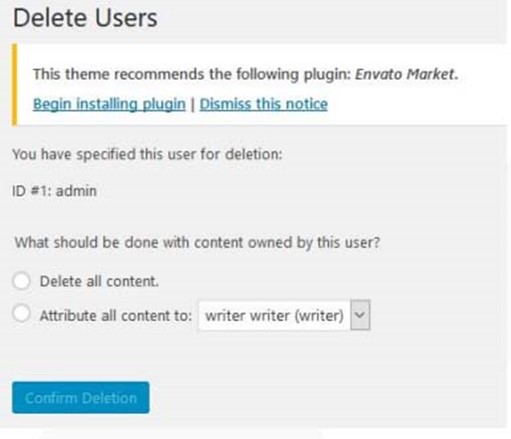
- After that log out then log in again using the new username. Then open the Users menu and remove the default admin username
- When deleting old users, be sure to move all content to new users you’ve created. Select Attribute all content to [new user]
- Done, you’ve created a new user through the WordPress dashboard
3. Use 2-Factor Authentication
The 2-Factor Authentication feature allows you to provide more layers of security in WordPress. Usually, this feature requires verification from another device, be it by email or phone number to make sure that the user is genuine.
You can find this feature when you sign up on Facebook, Google, Twitter, or Instagram. Not only large companies can apply 2-Factor Authentication. You can also implement it in your WordPress.
The trick is quite easy, which is to use the Two Factor Authentication plugin. After installing and activating the plugin, click the ‘Two Factor Auth’ link in the sidebar of the WordPress dashboard.
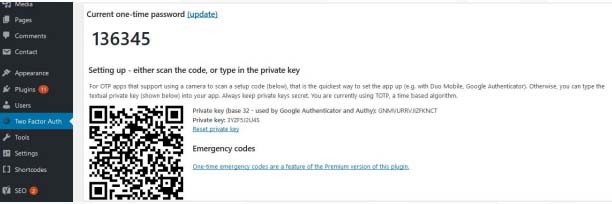
Then you need to install the authenticator app on your phone. There are several apps you can use such as Google Authenticator, Authy, or LastPass Authenticator.
In this tutorial, we used LastPass Authenticator. Open the app on your smartphone and select Add new account. After that, LastPass Authenticator will give you two options for adding a new account. You can choose to use the Scan barcode or Enter security key. Select a method.
You can get barcodes or security codes from plugins that you have installed before. You will get a notification that the application has successfully added two-factor authentication security for your website.
After that, when you log in to WordPress, you will be prompted to enter the One Time Password (OTP) sent to the app on your smartphone. So your WordPress login page is getting more secure!
4. Limit Login Attempt
By default, WordPress doesn’t limit how many logins a user can do. This is certainly dangerous because hackers can try logging into your WordPress admin many times until they find the right password.
You don’t want that to happen, do you?
Therefore, you need to limit the number of logins that users can do. It’s not difficult because you can take advantage of plugins. One of the plugins you can use is Login LockDown.
With Login LockDown, you can limit the number of login attempts made by users. All you have to do is install the plugin through the WordPress dashboard. After activating, go to the Settings menu > Login LockDown and you will see the settings as below:
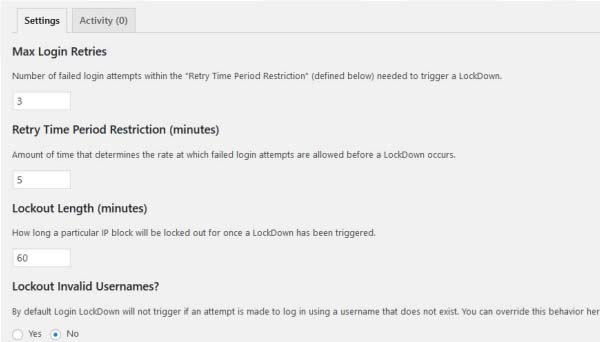
First, you need to specify the number of login attempts a user can do. You are free to set the amount according to your needs. Second, also specify the period it takes for users to try logging in again after reaching the maximum number of login attempts. Third, you can also temporarily block IP addresses that have crossed the login threshold.
5. Turn on Auto Logout
Security risks can occur at any time, even when you’ve successfully logged into a WordPress dashboard. If you’re already signed in to WordPress dashboard and aren’t doing any activities. Others can hijack it by changing the password settings in WordPress.
So it is better to implement automatic logout if the user does not perform activities on the WordPress dashboard within a certain period. It’s quite easy, you just need to install the Inactive Logout plugin. After successfully installing and activating the plugin, open the Inactive Logout > Settings menu to configure it.
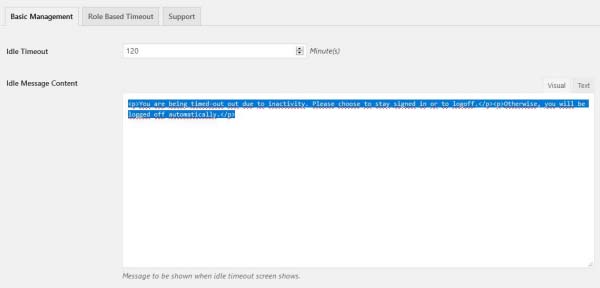
You can specify a timeout according to your needs. For notifications, you can leave them as above or you can also replace them with messages you created yourself.
6. Create Complex Passwords
Passwords are an important component in WordPress security. Don’t create passwords that are too simple and easy to guess. There is a lot of important data and files on your website. So never create a password that is too simple and easy to guess.
Once hackers get your WordPress admin password, your website’s security fortress has collapsed. Hackers can ruin your website and change your WordPress settings. The solution of course is to create complex passwords. If you’re confused about how to create complex and unpredictable passwords, there’s no need to worry. You can take advantage of WordPress’s Generate Password feature.
To use the Generate Password feature, open the WordPress dashboard. Then open the User menu and select the user you want to change the password for. Then click Generate Password under the Account Management field as below:

After that WordPress will create a password consisting of a combination of numbers, letters, and hyphens. The combination is quite complicated so it will be difficult for anyone to guess. So your WordPress admin area will be more secure.
If you’re worried about not being able to remember difficult password combinations, you can use an app like LastPass to store your passwords. LastPass helps you store passwords securely and you can use them for free!
Keeping WordPress Installation Secure
7. Disable WordPress PHP Error Reports
PHP error reports will certainly be very useful when errors are occurring in WordPress so you can quickly fix them. However, this PHP error report should not be visible to others.
If the report is visible to the public, hackers can see an error gap in your WordPress. Moreover, PHP error reports also often display your WordPress username. Of course, this is very dangerous for the security of your WordPress.
So we recommend that you disable PHP error reports. How to disable it is not difficult. You just need to add a few lines of code to the wp-config.php file. To access the wpconfig.php file, you need an FTP client like Filezilla.
After accessing the wp-config file.php using the FTP client, you need to add the below line of code:
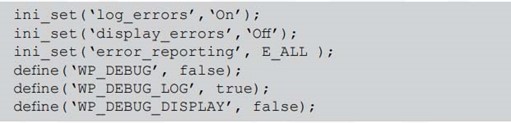
After successfully adding the above codes, your PHP error report has automatically become inactive. You’ve managed to close one WordPress security loophole!
8. Always Update WordPress to the Latest Version
Maybe this looks trivial. However, doing WordPress updates has a pretty significant impact on the security of your website. By using the latest version of WordPress, you’ve built a good website security foundation.
The use of this latest version of WordPress is very important because WordPress regularly releases updates, both minor and major updates. Every latest version of WordPress comes with improvements from previous versions. Besides, you can also use the latest features when using the latest version of WordPress.
WordPress itself always reminds its users to update to the latest version. You’ve probably seen WordPress update notifications in dashboards like below:

If you get a notification like the one above, it’s a good idea to update immediately. However, don’t forget to backup important data and files first!
If you missed the notification above, there are still other alternatives to doing WordPress updates. The first alternative is to use a plugin. You can take advantage of plugins like Easy Update Manager. This plugin allows you to perform WordPress updates automatically.
If you don’t want to install additional plugins and still want to update WordPress automatically, you can add the code below to the wp-config file.php.
image: define(‘WP_AUTO_UPDATE_CORE’, true);
In addition to the two ways above, there is still one more way to update WordPress, namely manually. This method is usually used when the WordPress update method automatically errors. To update WordPress manually, you need to download the latest version of WordPress on its official website and upload it using the FTP client. You can read the full explanation in the article How to Update WordPress Manually and Automatically.
img
9. Hide Server and PHP Information
Important information such as the server and PHP you are using should be hidden. Hackers can use these two pieces of information to find security flaws in your WordPress. To hide server information, you can add the code below to the .htaccess file in your WordPress root directory:
ServerSignature Off
As for hiding PHP information, there are two ways. The first way is to add the code below to the .htaccess file:
Header unset X-Powered-By
The second way is to add the code below to php.ini:
ini_set( ‘dispexpose_php = Offlay_errors’, 0 );
10. Hide WordPress Version Information
The WordPress version information you use can be used by hackers to find security flaws in your website. Therefore, it is recommended that this information be hidden from the public. There are two ways to delete the WordPress version information you’re using. The first way is to add the code below to the functions file.php the theme you’re using:
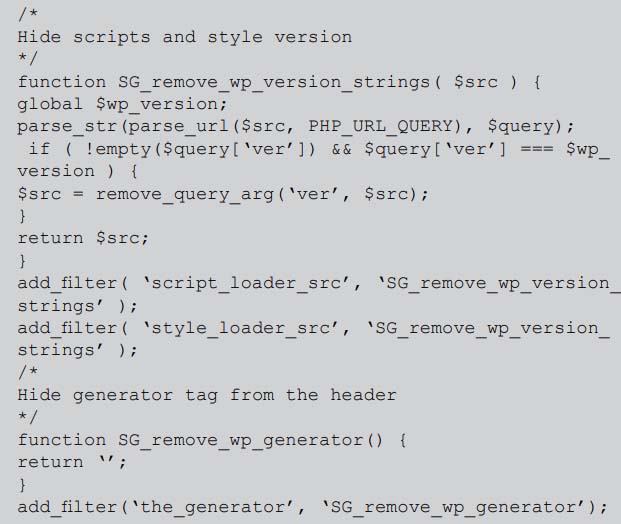
The second way is to add the line of code below to the .htaccess file in your WordPress root directory:
11. Install SSL/TLS
SSL or Secured Socket Layer is a protocol that encrypts the transfer of data between a website and a visitor’s browser. This encryption protects website visitor data from theft
Then what is TLS?
TLS stands for Transport Layer Security. TLS is an advanced development of SSL. SSL technology is now deployed and completely replaced by TLS. However, since most people are more familiar with SSL, the term is still used in conjunction with TLS. The functions of both are the same. It’s just that TLS has more advanced technology than SSL.
How do I know if your website’s SSL/TLS is active or not? It’s quite easy, if your website still uses the HTTP protocol in the URL, it means that your SSL/TLS is not active yet. Websites whose SSL/TLS is already active can be seen from the protocol used, namely HTTPS.
SSL/TLS has a huge influence on the security reputation of a website. Even since 2014, Google prefers websites that already use SSL/TLS to those that don’t.
Also, since July 2018 Google Chrome began marking websites without SSL as not secure. Google applies these rules to provide a more secure browsing experience for its users. This is certainly a warning for website owners to immediately add SSL /TLS on their website.
12. Avoid Using Pirated Themes and Plugins
Getting premium features without having to pay a dime does look tempting. You could easily get pirated themes or plugins on the internet.
You may not have to spend at all when using pirated themes or plugins. However, you pay for such pirated products with the security of your website.
Pirated theme makers and plugins can deploy malicious code into different files to disguise themselves making it difficult to detect and repair when your website is hacked. As a result, you can lose important website data. Besides, even worse, your website can be removed from Google’s index which causes your website to not appear in search results.
Sure you don’t want that to happen, do you?
Never pawn the security of your website just for pirated themes and plugins. In addition to potentially threatening the security of the website, you also do not appreciate the developers of the original themes and plugins. So it’s best to always avoid pirated themes and plugins!
13. Always Update The Themes and Plugins You Use
Using official plugins and themes alone is not enough. You also need to regularly update themes and plugins. Developers always fix bugs in the latest versions of plugins and themes they create. This is done to close the cracks that can be entered by hackers.
So be sure to update the plugins and themes you’re using. In order not to forget to update the plugin to the latest version, you can take advantage of the help of plugins such as Easy Update Managers.
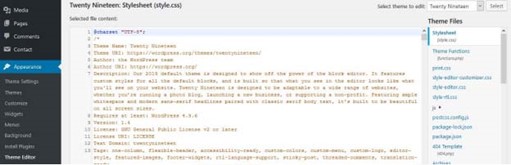
Unfortunately, there is no plugin yet that allows you to update WordPress themes automatically. You need to update it manually via dashboard > Appearance > Theme. Then select the theme you want to update. There will usually be a notification like below when the theme needs to be updated:

14. Remove Unused Themes and Plugins
At the beginning of installing WordPress of course you try many plugins and which theme is suitable for your website. After specifying one theme and several plugins, you may forget to remove unused themes and plugins.
The bad news is, unused plugins and themes can be a hacker loophole to attack the security of your website. How could it be? Hackers can perform scanning of plugins or themes that have not been updated and then can open access to your WordPress dashboard admin.
Therefore, to avoid unwanted things, it’s a good idea to remove plugins and themes that you no longer use. Anyway, you haven’t used it either, have you? So in addition to reducing security risks, you can also save space in your WordPress.
Securing Files and Databases
15. Disable File Editing
WordPress allows you to edit theme files and plugins directly through the code editor feature. While useful, this feature can also compromise the security of your WordPress.
If hackers manage to get into your WordPress dashboard, they can tinker with your theme or plugin files. As a result, your website can get messy because of hackers who damage your theme files or plugins.
So we recommend that you disable file editing permissions in WordPress. It’s pretty easy. You just need to add the below line of code to the wp-config file.php:
define( ‘DISALLOW_FILE_EDIT’, true );
16. Use .htaccess
A commonly known function of .htaccess is to ensure links in WordPress work correctly. Whereas the .htaccess function is not only that. Another function of .htaccess is to enhance the security of your WordPress.
Here are three ways to improve WordPress security using .htaccess:
- Blocking access to administrator pages you can restrict administrator page access from certain IP addresses using .htaccess. You can simply add the code below to the yyy file:
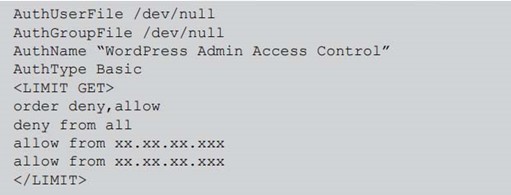
fill xx.xx.xx.xxx with the IP address you want to allow to access the WordPress admin page. There is no limit to the number of IP addresses you can add. So you can add as many IP addresses as you want.
Note: This method is not recommended for dynamic IP addresses.
- Disable PHP execution in a specific folder
Hackers often take advantage of the folder upload feature in WordPress to upload backdoor scripts. Whereas the folder upload feature should only be for uploading media files. You can close this gap by disabling PHP execution in a specific folder.
The trick is to add a new .htaccess file in the /wp-content/uploads directory using the line of code below:
image

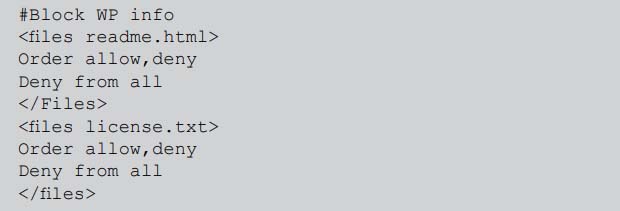
- Protects wp-config files
Inside the wp-config file are the core WordPress settings and MySQL database details. This means that wp-config is a very important file for your WordPress. Hackers often make the file the target of hacking. So you need to protect those files extra.
You can protect the wp-config file by using the .htaccess code line below

17. Disable XML-RPC Function
XML-RPC is a feature of WordPress that allows its users to access the WordPress dashboard remotely. With XML-RPC, users can publish posts in WordPress via email by running trackbacks and pingbacks.
While it looks useful, unfortunately, it also opens up security risks for your WordPress. The first security risk is that this feature can be utilized by hackers to run brute force attacks on your WordPress. Hackers can also more easily send DDoS attacks through pingbacks run by XML-RPC.
Therefore, we recommend that you disable the XML-RPC feature. There are two ways to disable it. The first way is to use the plugin. There are several plugins you can use.
The first plugin you can use is Disable XML-RPC
Just activate the plugin above and the XML-RPC feature in your WordPress will automatically become inactive. However, you also need to understand that disabling XML-RPC can affect the performance of some plugins. Because there are some plugins whose performance is related to XMLRPC.
If you only want to disable some XML-RPC elements, you can use the Stop XML-RPC Attack plugin or control XML-RPC Publishing.
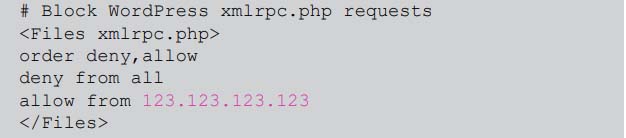
In addition to using plugins, you can also disable XML-RPC manually. It’s pretty easy. You just need to copy the code below and insert it into your .htaccess file:
18. Disable Directory Browsing
Directory browsing is an index page that displays important information about the plugins, themes, or even the servers you use. This index page usually appears when the server cannot find an index file such as index.php or index.html. While it may seem trivial, hackers can take advantage of important information in the browsing directory to find gaps in your WordPress dashboard. Therefore, you need to disable this feature to minimize your WordPress security gaps.
Here are the steps to disable directory browsing:
- Open the .htaccess file in the root directory of the website. You need to use an FTP client like FileZilla to perform this step.
- Download the .htaccess file
- Open the file using the text editor. You can use Notepad
- Add the Options -Indexes code at the very bottom of the .htaccess file
- Save the changes
- Upload edited files using FTP client
19. Use CDN
Content Delivery Network or CDN has many benefits for websites, one of which is to improve the quality of website security. What are the benefits of CDN for the security of your website? Here are three benefits:
CDN enables a useful firewall to protect websites from online attacks
- CDN prevents brute force attack and blocks malicious attacks such as DoS or DDoS
- The CDN hides your server’s real IP address, preventing direct attacks on the server’s real IP address you are using.
Many companies provide CDN services, both free and paid. If you want a free CDN with good quality, Cloudflare can be an option. Some hosting providers already integrate Cloudflare into their hosting services.
20. Perform Regular Backups
Of course, no one ever expects the website to be hacked. Even so, every website owner should always be prepared if the worst is possible. Because anyone can be subjected to malicious attacks on the internet. Both government websites, large corporate websites, and personal websites can both be affected by online attacks. Therefore, you should have a backup of all website data. So if your website is hit by a malware attack or hacked, you can’t restore the website to its original state quickly.
Jetbackup feature that makes it easy for you to perform self-backups. Jetbackup supports more features than regular cPanel backups. Here are some of its advantages:
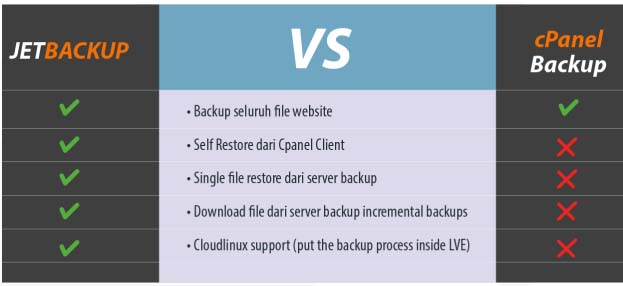
Using it is quite easy, you just have to follow this guide to back up using Jetbackup. You can do a self-backup according to your needs.
Because of the importance of backups, relying on backups from hosting services and independent backups alone is not enough. As a precautionary measure, you can also install a backup plugin to run automatic backups. One of the automatic backup plugins that you can take advantage of is UpdraftPlus.
21. Change WordPress Database Prefix
WordPress database contains all the important information and data of the website so it is often the target of attacks by hackers. By default, WordPress uses wp_ as the prefix for all tables in your WordPress database.
The use of the default prefix is certainly quite dangerous because it is easy to be known by hackers. Therefore, you need to replace it. However, before you start replacing the WordPress database prefix, make sure you’ve made a backup of it first.
If you’re done backing up, you can start the prefix replacement process by following the steps below:
- Open the wp-config.php file located in your WordPress root directory
- Change the wp_ code to another code as wp_a123456_. The result will be as below:
$table_prefix = ‘wp_a123456_’;
Note: You’re only allowed to use numbers, letters, and underscores
- After that, open phpMyAdmin. You can access it through your cPanel
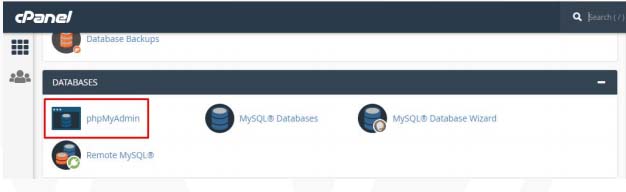
- Then open your WordPress database
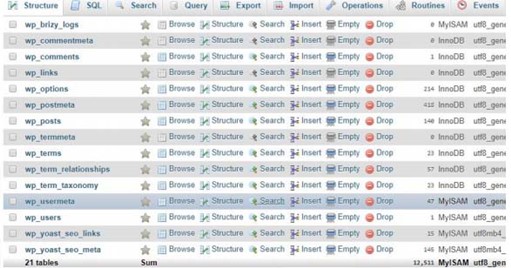
- In the above screenshot, 21 table names need to be changed.
Of course, renaming tables one by one is quite troublesome. No need to worry, you can take advantage of the SQL features and use the templates below.
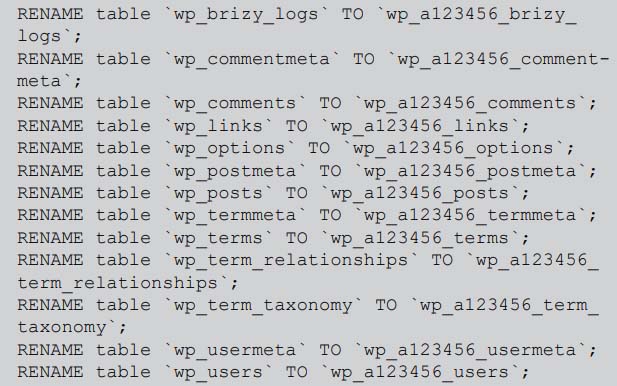
Note: The above template is just an example. You need to customize it with your WordPress database and the database prefixes you’ve created in the beginning.
Security Tips Bonus
22. Install the Security Plugin
Installing security plugins is an obligation for all WordPress owners. The WordPress security plugin helps secure your website from online attacks. There are many WordPress security plugins with different features. Some are free, some are paid.
There are now many security plugins available for free. One of the free security plugins that are 100% free is All In One WP Security and Firewall. This plugin is developed open source so that it can be enjoyed by many people for free.
In addition to the above plugins, there are still many other security plugins that are no less great. Some of them are Jetpack, Wordfence, and Sucuri. All three plugins provide two versions: free and paid.
If you only need basic security features, you can use the free version. However, feel free to buy the paid version if you need it! Think of it as an investment for your website.
23. Scan WordPress to Detect Malware
Some WordPress security plugins provide regular malware scan features in WordPress. Jetpack, Wordfence, and Sucuri both provide malware scan features in their free features.
In addition to taking advantage of the built-in features of the plugins above, sometimes you also need to perform a manual malware scan to make sure that your WordPress is completely secure.
You can perform a manual malware scan through the following malware detection sites:
24. Turn on Firewall
One of the basic security measures of WordPress is to enable the website firewall. A website firewall helps to block malicious traffic even before it reaches your website. The firewall also serves to protect data from hackers and unauthorized users. Therefore, you need to enable a firewall to improve the security quality of your WordPress. You can activate the firewall easily with the help of plugins.
Many plugins offer this feature. Some of them have been mentioned in the previous points, namely Sucuri and Wordfence. In addition to these two plugins, there are still other alternatives available such as Cloudflare, SiteLock, and BulletProof Security.
25. Choose a Trusted Hosting Service
The last and most important step is to choose a trusted hosting service. You can’t choose the original hosting because all your website data will be stored on the hosting server. So be sure to choose quality proven hosting, especially on the security features offered.
Imunify360 is the latest website security solution that can protect the website perfectly. Here are six key features of Imunify360 that will protect your website
You:
- Advanced Firewall
With integrated artificial intelligence (AI) and immunity technology, Imunify360’s advanced firewall can detect security threats and protect your website thoroughly.
- Intrusion Detection and Protection System
In addition to addressing malicious attacks on the website, Imunify360 is also able to detect potential attacks. Imunify360 will automatically block IP addresses that indicate suspicious activity on your website.
- Malware Detection
Malware is a common security attack. Imunify360 performs scanning on all files on the website so that potential malware attacks can be detected early. Infected files will be quarantined so that losses can be avoided.
- Proactive Defense
Proactive Defense can stop malware that even scanners can’t detect! This feature will identify security threats on your website in real-time and block potential threats automatically in no time.
- Patch Management
Updating the latest server kernel is an obligation to maintain server performance. Patch Management allows your server kernel to stay up to date without rebooting and not interfering with server performance at all.
6.Reputation Management
The reputation of your website is very important. Imunify360’s Reputation Management feature helps users maintain a website’s reputation. And there will be a warning if your website is blacklisted by Google or SBL. So you can solve the problem faster.