
Many big names entrust the development of their websites on this platform. For example, Sony Music and Facebook Newsroom.
Even 40% of websites worldwide use WordPress because the platform is capable enough for a variety of purposes. Starting from building a personal website, online store to company profile website.
However, managing a WordPress website requires the right steps for optimal results.
How? What do you need to do to make your WordPress website fast and secure? How to prepare it for future development needs?
Quiet. All of these questions will be answered through the guide in this article. You’ll know how to manage your WordPress website precisely and easily. So, let’s start the discussion.
Table of Contents
1. Make Your Website Fast
Website speed is very important. If the loading is slow, websites with interesting views will not give good results. These can be two things that happen to your website:
- Losing visitors — No one wants to wait long, does it? 53 percent of internet users will leave a website that loads for more than three seconds. Too bad if visitors end up not transacting because your business website is slow?
- Difficult to appear on Google — To ensure user convenience, Google will only display fast websites in search results. If your website is slow you should be prepared to be disappointed. Because, without getting Google rankings, your organic visitor count is hard to increase drastically.
- Browser optimization to speed up the loading of websites in visitors’ browsers.
- Server optimization to make the process of sending website data to the browser faster.
Perform Optimizations for Browsers
To make the website faster, optimization can be done from the front end. This optimization will help the browser to display information much faster.
What steps do I need to take?
Reduce Image File Size
Loading the website will slow down if the file size of the image to be loaded is too large. Therefore, it is important to reduce the file size of the image by compressing it. How?
Now, there are many online tools that you can use to reduce the size of your images. For example, TinyPNG and compressor.io. Simply upload the image you want and the compressing process will run automatically.
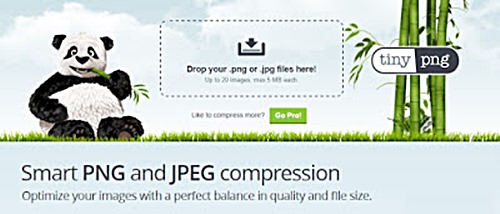
No need to worry, the dimensions of the image will not change. However, as the quality will be slightly reduced, make sure the image can still be displayed properly.
In WordPress itself, some plugins can compress images automatically. Smush, for example. This plugin can compress all images in the WordPress Media Library.
What if the image file size is still hundreds of kilobytes after you compress it?
If so, you need to resize or shrink its dimensions. This you can do with your computer’s built-in tools, such as Microsoft Paint. Alternatively, online tools like iLoveIMG can also be used.
Using Embed Video
Using embed video is quite effective as an optimization step for browsers. What do I need to do?
First, you must upload the video to a trusted platform. YouTube or Vimeo, for example.
Second, copy the URL of the video you’ve uploaded. It’s important to connect the video to WordPress.
Third, place the video on the post you want.
To do this, simply click the plus (+) button in the WordPress editor and select the platform used as in the example image below.
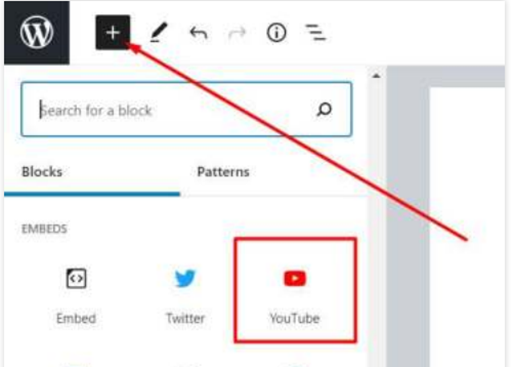
Then, copy the video URL to the field provided in the embed block as below.
Well, how can embed video affect website speed?
The reasons are two:
- Storing videos on your platform will save your server storage.
- The quality and loading speed of your videos is ensured good, especially thanks to a more optimal compression system like on YouTube.
Spruce up CSS and JavaScript Code
The code inside the CSS and JavaScript files must be neat to be processed quickly. To do so, you should minimize unnecessary whitespace or variables.
The good news is, you don’t need to manually tidy up your CSS and JavaScript code. Just leave the task to a tool like prettier.io. In a matter of seconds, your codes will be optimal.

Also, don’t forget to shrink the size of your CSS and JavaScript files. This you can do by enabling GZIP compression in WordPress.
Enable Lazy Loading
In addition to optimizing these files, there are several other ways that you can also practice. Using lazy loading is one of them. With the lazy loading feature, you can delay loading images when the website page loads. So, the new image will load when the visitor reaches the part of the page where the image is located. How to enable lazy loading in WordPress is very easy. All you have to do is install the Lazy Load by WP Rocket plugin.

Avoid Rendering Block JavaScript
Website speed optimization can also be done by avoiding JavaScript rendering blocks. A render block is a state in which a new website page can be displayed fully after the JavaScript code has been executed. Of course, this will slow down the loading of the website.
Fortunately, you don’t have to manually address rendering blocks. All you have to do is install the W3 Total Cache plugin that will perform the task.
Perform Optimizations for Servers
Server optimization is required to respond quickly to requests from the visitor’s browser. What are the ways?
Update PHP Version
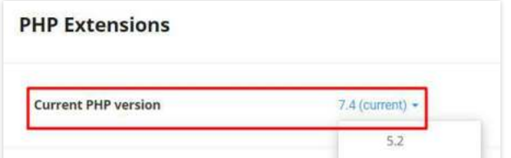
The use of the latest PHP version is highly recommended. The reason is, your website will be more secure and PHP script processing will be more optimal thanks to improvements to each update.
Fortunately, you don’t need to update the PHP version yourself. Your hosting provider is already handling it for you. If the hosting provider already supports the latest PHP version, all you have to do is activate it through the hosting control panel. You can do this via cPanel.Then, click Select PHP Version. Make sure you have selected the latest version on the Current PHP Version.
Reduce Database Query
All processes that require searching data in the database take time. Moreover, if the structure of your website is complex and has a large database, the process will take longer. For example, when you search on an online store website that has many products. Fortunately, you can speed up the process in two ways,
I.e:
- Reduce the number of products per search results page
- Avoiding the use of meta queries
You can reduce database queries by minimizing the number of search results per page. To do this, you can access files wp_query on your website with FTP. Next, change the value posts_per_page as desired.
Also, avoid using meta queries. This type of query looks for post metadata or product pages resulting from the use of custom fields. Although it can improve search accuracy, meta queries burden the search process in the database.
Therefore, reducing the use of custom fields can be a solution. Alternatively, you can use WordPress taxonomy.
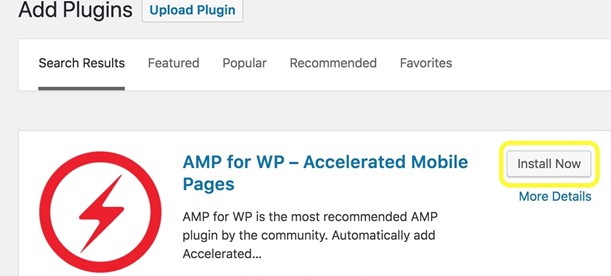
Use AMP
AMP (Accelerated Mobile Pages) is a feature that reduces the use of CSS, HTML, and JavaScript scripts to make websites appear faster on mobile devices.
Why is using AMP important? Because most people now access the internet through a smartphone or tablet. Mobile traffic has continued to increase by 222% in the last 7 years.
Without special optimizations, your website will be loading longer. It could be, will miss the opportunity to get more mobile visitors.
To enable AMP on a WordPress website is pretty easy. All you have to do is install the AMP or AMP for the WordPress plugin on that website.
Enable Cache
The cache is temporary file storage to make websites faster when accessed again. The cache can be located on the server to speed up the file request process or in the browser to display the website faster.
Managing the cache on the website is very important. One way to do this is by leveraged browser caching. This step not only ensures the cache is active but also sets how long the cache stores temporary files.
How? You can modify the .htaccess file or simply use the plugin.
Not only on the browser, but system caching is also required for the server. There are already many WordPress plugins that can be used to manage caches such as WP Rocket or LiteSpeed Cache.
The good news is, some hosting services are already supported by LiteSpeed Enterprise servers. With this server, you can maximize the performance of the LiteSpeed Cache plugin. Cloud Hosting users can take advantage of LiteSpeed Memcached for more optimal website speed.
Use CDN
CDN or content delivery network is the use of servers in various countries to store temporary files of the website. Thanks to CDN, access to the website can be faster because data can be retrieved from nearby servers. One popular CDN provider is Cloudflare. To be able to take advantage of Cloudflare services, your hosting service provider must already support the CDN.
How to Check Website Speed
(How do you know how fast your website is?) Then, what speed optimization needs to be done? To find out, you can do an online check. Wrong
one, use a website speed check tool like Pingdom.
Just enter the URL of your website in the field provided and wait for the checking process. The test results of this free tool will show you aspects related to website speed, both good and improved.
Not only that, but Pingdom will also tell you the time it takes for each requested file on your server. That is, you will know how fast the website is. The data is presented in the form of a table for easy understanding.
Want to know more about using Pingdom for websites? We discussed it in an article about the Importance of Website Speed in Doing Business.
Well, if speed is your main concern, don’t miss the discussion of WordPress speed in our article Tips for Making WordPress Super Fast.
Checklist to Create a Website Fast.
- Reduce image file size
- Use embed video
- Spruce up CSS and JavaScript code
- Enable lazy loading
- Avoid rendering JavaScript blocks
- Update PHP version
- Reduce database queries
- Use AMP
- Enable caching
- Use CDN
2. Protect Website Security
Is having a fast website enough? Yet.
Although the speed of the website helps make visitors feel at home, the security of the website should not be forgotten. Moreover, cybercrime attacks from hackers on average occur every 39 seconds and anyone can be the victim.
Not to mention, the form of attacks are various. Starting from a DDoS attack that tries to make the server down to malware that can steal various website data. Pretty worrying, huh?
The impact of hacker attacks is serious. On personal websites, hackers can use it for fraudulent purposes. As for business websites, being a victim of cybercrime will affect the reputation of the business.
So, let’s protect the security of your website. How?
Use the Latest Version of WordPress
WordPress is a powerful CMS platform with a powerful security system. However, since 63.5 percent of websites are created with such platforms, it’s no wonder WordPress is the target of attacks.
If caught off guard, hackers can exploit existing security loopholes. Therefore, it is important to always use the latest version of WordPress. Because, on every update, all the bugs that allow hackers to infiltrate are always trying to be closed.
How do I update?
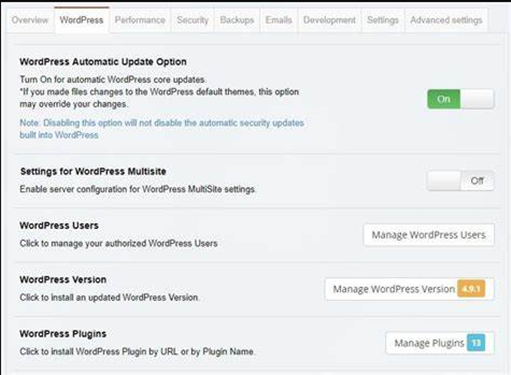
When there’s an updated version, you’ll get a notification in the WordPress Dashboard. Just click the notification and the update process will run.
Want to do it automatically? Can.
With this feature, you won’t miss the latest version updates again.
Always Use Trusted Themes and Plugins
WordPress has a large selection of themes and plugins. We recommend that you only use trusted themes and plugins, either free or paid versions.
Always prioritize themes that get frequent updates. Because the developer always releases improvements from existing security gaps.
Don’t forget to also buy themes from trusted developers. In addition to the guaranteed quality, not infrequently you will get support assistance if you experience obstacles.
Also, choosing themes and plugins with positive reviews from many users is highly recommended. You come to know how the quality of those themes and plugins according to the user.
Last but not least, never be tempted to use nulled themes and plugins. The reason is that pirated themes and plugins are vulnerable to malware. Instead of wanting to improve performance, your website can instead be mastered by hackers.
Just in case, you can take advantage of Imunify360. Imunify360 can search for and delete malicious files and scripts in
WordPress website with ease.
Secure WordPress Login
WordPress login is still a favorite place for hackers to launch cybercrime attacks. Unfortunately, many WordPress user login pages are not secured. Well, what are some ways to protect WordPress login from hackers?
First, change the WordPress login URL. By default, anyone can access the login page by adding /wp-login behind the website URL. If you already know the login page, hackers could have taken a brute force step to guess the username and password.
Well, to change the URL, you can use WPS hide login plugin. Next, specify a unique URL for your login and only you know it.
Second, make sure your password is long and not easy to guess. The recommendation is to use a combination of numbers as well as upper and lower case letters. No need to be afraid to forget the unique password. You can use various password storage tools such as LastPass or 1password.
Third, enable 2-factor authentication (2FA). With this feature, each login to WordPress requires you to enter a secret code sent to another device or your email. However, you must already be registered on services for 2FA such as Google Authenticator and Authy.
To integrate the 2FA tool with WordPress, you can install the Two Factor Authentication plugin.
Protect Your Website with SSL
SSL (Secure Socket Layer) is a security protocol that can protect your website’s data traffic. SSL serves to encrypt data so that the information can not be known. This is especially important for online store websites that process a lot of personal data and payments.
Is your WordPress website SSL protected?
If the padlock sign appears as above, SSL is already active. If you haven’t already, you can buy it from your SSL service provider for the features you want.
Disable Theme Features and WordPress Editor
Plugins have built-in theme editor and plugin features. Unfortunately, this feature is one of the loopholes that hackers often exploit. If the website is successfully compromised, hackers can fill in the theme code or plugin with malicious scripts.
The solution is to disable the theme editor and plugins. This is done by accessing the wp-config file.php with FTP. Then, add the define code( ‘DISALLOW_FILE_EDIT’, true );.
Checklist to Keep Your Website Safe
- Use the latest version of WordPress
- Always Use Trusted Themes and Plugins
- Secure WordPress login
- Protect websites with SSL
- Disable theme features and plugin editor
3. Manage Website with The Right Steps
Website management is inseparable from coding. No matter what steps you take, always use the correct steps. For example, when you want to change the look of the website by editing the theme. In general, there are several stages in making coding changes, namely:
- Make a backup: save duplicate websites that can be restored at any time
- Create staging: create a temporary duplicate of the website that is placed on the server. The changes you make in staging will not affect your website.
- Create duplicates in localhost: same as staging, but you do it on a computer device (localhost).
Well, let’s review one by one the above stages.
Backup Website
Backup is the step of duplicating a website file and saving the duplicates for reuse. These duplicate files can be stored on servers, in third-party online storage, or offline storage.
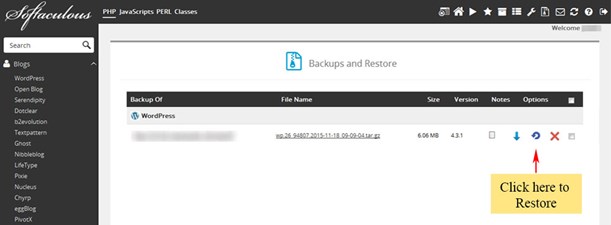
Making backups is important in website management. If the website is damaged or inaccessible due to a coding error, the backup can be restored. Thus, your website will return to the state when the backup was made.
So, always back up the website before fiddling with the code. To be more secure, make sure that your website is backed up periodically.
Well, WordPress backups can be done with plugins. For example Updraftplus. This plugin allows you to store backups in some popular online storage, including Dropbox and Google Drive.
Unfortunately, backups through plugins can only be done manually.
However, for certain hosting users, there is a way to perform backups automatically. Simply take advantage of the Auto Backup feature in the Member Area. With this feature, the website will be automatically backed up every time there is an update to the WordPress version.
Creating Staging
Staging is a duplicate website that you can tinker with without affecting the actual website. Unlike backups, staging works just like the original version of the website
You.
Therefore, staging is utilized to try to change the look or features of the website. Once you want, you can immediately activate the changes on the actual website.
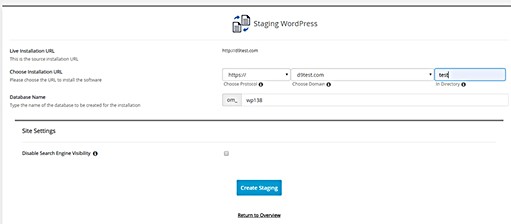
To create a WordPress staging in cPanel, you just need to access the Softaculous Installer. On the WordPress application page, you can select the staging menu and follow the next steps.
Creating staging for users is much easier. Thanks to the Staging menu in WP Management in the Member Area, with just a few clicks, the process can already be run…
Creating Duplicate Websites on Localhost
This second way is similar to creating staging. It’s just that, instead of using cPanel, you do it offline.
Compared to staging, creating duplicate websites on localhost has its advantages. Change results can be displayed very quickly. The reason is that all the website files are on the PC you’re using.
However, the effect of such changes may not be following the actual conditions. This is because the localhost hosting environment is different from the online version of the website.
Well, how do I create a duplicate website on localhost?
The first step is to install applications for simulated hosting servers, such as XAMPP and AMPPS. Next, you can install WordPress on localhost.
Make modifications to the WordPress website as you wish. If it is appropriate, upload the website to the hosting server.
Checklist to Manage Websites with The Right Steps
- Backup website
- Create staging
- Create duplicate websites on localhost
4. Solve Errors in WordPress Appropriately
When managing a WordPress website, it’s not uncommon for you to encounter various errors. The causes can vary. If not addressed immediately, it is not unlikely that the error will cause the website to experience greater problems.
Well, in this section we will discuss what are the types of errors in WordPress, their causes, and how to solve them.
Recognizing Errors That Occur
If you find an error in WordPress, don’t panic first.
The first step to do is to recognize the error. While it may sound trivial, it ensures you don’t just guess the cause and solution of the error.
Let’s start with a simple example: one of the HTML elements on your website page is inaccessible. Before speculating on the root cause, try to remember what was done until the error occurred.
You can do a simulation by retrying what you did. If it is proven to cause the same error, then
that’s what caused the error. Document the findings, then try to solve the problem.
An easier way is to use the Site Health feature in WordPress. This feature you can access in the Dashboard.
On the Site Health features page, you’ll find two panels: Status and Info:
- The Status Panel displays the conditions of your WordPress website. If you find an error or a setting that doesn’t match, you’ll get a recommendation to fix it.
- The Info panel shows the specifications of all the software your website uses, including WordPress, themes, plugins, and hosting server software. This information can be used as a handle when there is a plugin or theme that has problems and you consult the relevant developer.

Resolving Errors in WordPress
Once you’ve recognized the type of error that occurred and documented it, it’s time to resolve the error. For simplicity, you can group them according to the type of error first.
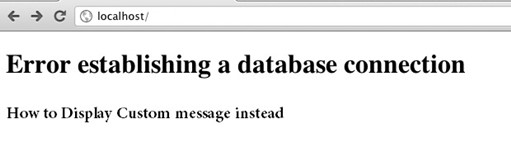
Error Database
Database errors can cause your website to be inaccessible. Typically, the error message that appears in the browser is Error Establishing a Database Connection.
The following is common and causes database errors:
- Your database is corrupt.
- The username or password used by the website does not match the one configured in the control panel.
- Your hosting server is down or traffic is high so it is not able to serve the demand well. To ascertain the cause, log in to the WordPress Dashboard. If you can access the Dashboard, the problem is the database username or password…
First of all, check the database username and password in the wp-config file using file manager in cPanel. Then, look for the section of code that shows the database credentials. For example as below:
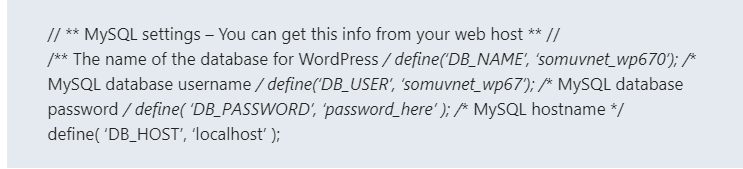
Note the code, then access MySQL Databases in the control panel to check the correct login credentials. Thus, all you have to do is customize the login information in the wp-config file.
Error Loading
Have you ever encountered a blank white page when accessing the website? If ever, that means your website has a white screen of death error. Error caused by something like this:
- The theme or plugin used is not compatible with the WordPress version
- The presence of problematic code on the theme or plugin
- There is a memory limit If the cause is a plugin, the first solution of this type of error is to disable your plugins one by one. If your website is normal after one of the plugins is turned off, you’ve found the plugin that caused the error.
If the above method still doesn’t work, try using the built-in WordPress theme first. This is to ascertain whether the constraints are derived from the use of the theme.
If the loading error is caused by a memory limit, you must increase the memory limit on the server.
To do this, access the wp-config file with the file manager in the control panel or FTP client. Then, add the following code into the file:
define(‘WP_MEMORY_LIMIT’,’64m’);
Save the file, then check your website again if it’s normal again.
Error Media
WordPress errors can occur when you upload images to the Media Library. If this happens, the file fails to upload and you’ll see an “HTTP error” message.
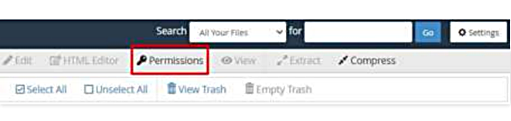
Well, this type of error can be caused by several things. One of them is the wrong permissions in the wp-content/uploads/images folder.
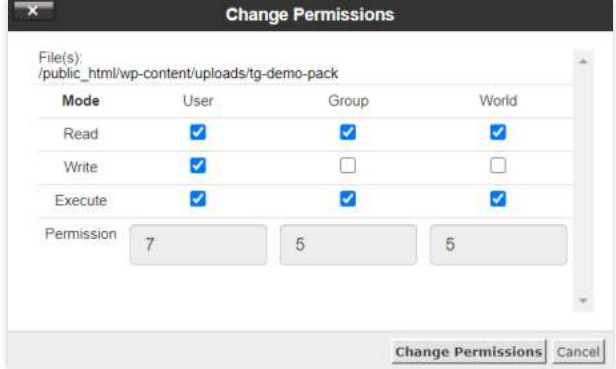
To solve this error, the first step is to check the folder’s access permissions in the cPanel File Manager. Then, click the Permissions button.
In the pop-up window that appears, make sure that the number in the permission field is 755. This means that the permissions to read and run the program apply to everyone. If a number appears differently, make a replacement.
Another solution to HTTP errors when uploading images is to add code to the .htaccess file. To do this, type the SetEnv code MAGICK_THREAD_LIMIT 1 in the file.
Website Display Error
If your website looks bad, it’s most likely a tag in the HTML or CSS code that isn’t correct. This issue is vulnerable if you copy the content of a website page from Microsoft Word to the WordPress editor directly.
For the website to return to normal view, you just need to copy the contents of the page to Notepad on your computer. Then, move it again to the WordPress editor. Easy, isn’t it?
Error SSL
As explained earlier, SSL is useful for securing data traffic on your website. Unfortunately, problems sometimes arise after you install SSL. It could be that the browser still considers the website not yet secure. Alternatively, the browser instead blocks access to the website.
The causes of SSL errors like the above can be solved easily. To do this, install the Simple SSL plugin. This plugin will force the website to use the HTTPS protocol.
Error HTTP
There are several kinds of WordPress errors related to HTTP. Well, the most common occurrence is Error 404. If this happens, the webpage you are accessing does not appear. Instead, a message appears reading “404 Not Found” or something like that.
Error 404 can be caused by two trivial things, namely incorrect URL or browser cache. Of course, you can solve it by typing the correct URL.
Additionally, you can clear your browser’s cache if a 404 error occurs. The reason is, it could be that the website you visited already has the latest version while the cache still stores the old version so that an error occurs.
However, Error 404 can also happen because some plugins or themes mess up your website URL. If the previous two solutions don’t work, try disabling the theme in WordPress. Do the same with your plugins to find the source of the problem.
A more severe 404 error is when the error message also appears when you access the WordPress Dashboard. If the case is like this, you should disable themes and plugins using the FTP client.
Checklist to resolve WordPress Errors
- Recognize errors that occur
- Resolve errors in WordPress
5. Hosting Migration
One of the important things in managing a WordPress website is migrating hosting. This step is not common. However, it is very important when your website is experiencing problems.
For example, the server you are using is slow, hosting package service prices are less affordable or customer support is not helping you well.
Whatever the reason, hosting migrations can be done on their own and the way is not as difficult as you might think.
Well, before starting the migration process, it’s important to make sure that the control panel at the new hosting service is the same as the one your website uses. For example, cPanel. If it is the same, the steps that need to be done are as follows:
Moving Files to New Hosting
File transfers need to be done appropriately. If something goes wrong, you could lose important website files and the website will be messed up.
To move files to a new hosting, there are five easy steps to take:
Download Website File
As a first step, you need to access the website files and download them to your computer. You can do this through cPanel File Manager or FTP client.
All WordPress files are usually stored in public_html folder. So, open the folder, select all the files and subfolders in it, and then right-click. In the menu, click Compress. This will bring up a pop-up menu.
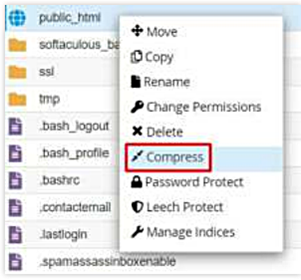
In the menu, select Zip Archive and click the Compress File(s) button. All WordPress files are instantly included in one compression file. Download this file by right-clicking it, and then selecting Download.

Export Website Database
Once all the files have been downloaded, you also need to export the database by downloading them via phpMyAdmin in cPanel. On the phpMyAdmin menu, select the database you want to export if there is more than one. To make sure the database is correct, check-in the wp-config file in the public_html folder.
After that, click the Export tab and choose options for both columns below:
- Export method: Quick
- Format: SQL
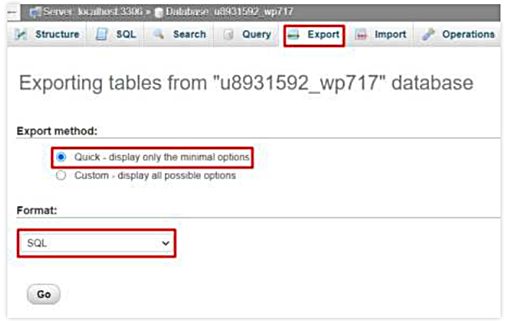
Click Go and wait for the export process to finish.
Upload Files to New Hosting
Once the website files have been downloaded from the old hosting, it’s time for you to upload them to the new hosting. In the same way, access File Manager in cPanel first.
Next, open the public_html folder and click the Upload button at the top of the File Manager.
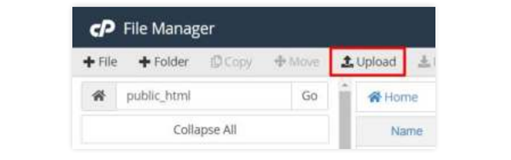
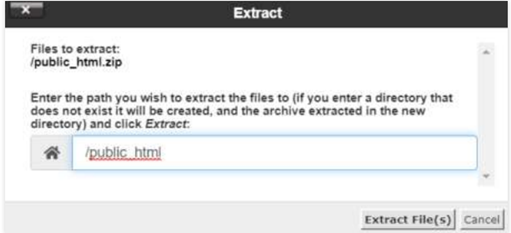
Clicking the button opens a new page. Inside, click the Select File button to select the WordPress file you have downloaded. Now all you have to do is extract the file. Right-click on the file you just uploaded, and then choose Extract File. Make sure the files are extracted in the public_html folder by typing the folder name in the field provided.
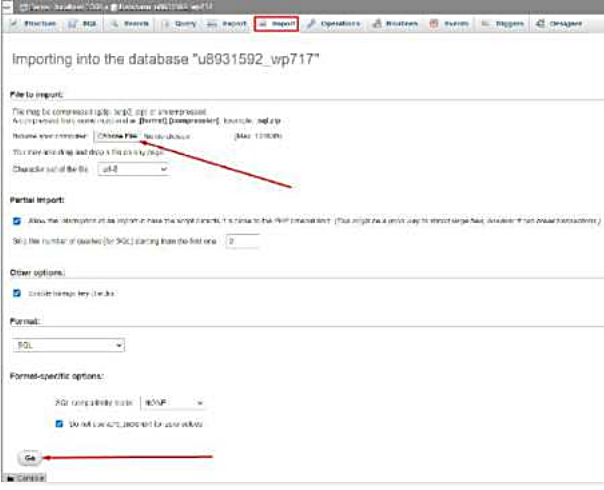
Import Database to New Hosting
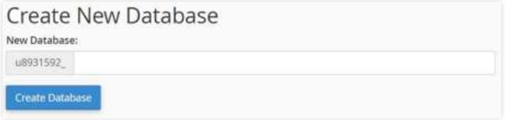
Before importing the database into new hosting, create a MySQL database. To do this, access cPanel on the new hosting and click On MySQL Databases. In MySQL, there are a few steps you have to take. First, specify the name of the database and click Create Database.
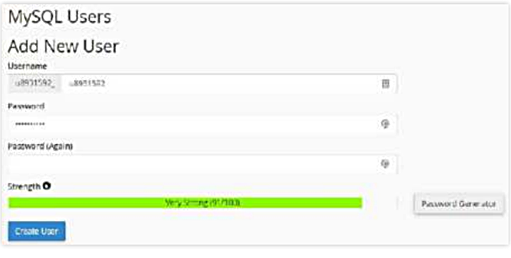
Second, create a new user for the database. For this, you need to specify a username and password. Click Create User if all data is confirmed as desired.
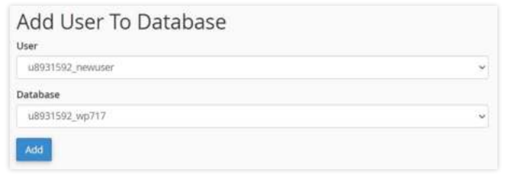
Third, add the user to the database. Fill in the user name data in the User column and the database name in the database column. If the data is correct, click Add.
Fourth, check all the Privileges options on the next page. Then, click Make Changes. Now, you are ready to import the database through phpMyAdmin.
Next step, access phpMyAdmin and click the Import tab. In that tab, click Choose File to upload the database from the old hosting you’ve exported. Then, click the Go button to import it.
MySQL Database Detail Settings
After the file migration and database export have been done, the next step is setting the details of the MySQL database. For the new database to be used, you must specify its name, username, and password in the wp-config file. Access the file, and then change the value of the three components below according to the details of the new database:
- DB_NAME — database name
- DB_USER — username
- DB_PASSWORD — password
In the wp-config file, you will also find the HOSTNAME component with the localhost value. Normally, this setting does not need to be changed. However, check with your hosting provider’s customer support to be sure.
Redirecting a Domain to a New Hosting Server
If all of the above steps are successful, you just have to change the domain name server. The steps are different for each hosting provider. Well, what is exemplified below is the step of renaming the nameservers in Namecheap for example.
Before you begin, you should know the name of the server used, namely:
- ns1.examplehosting.com
- ns2.examplehosting.com
Typically, the name server is mentioned in the email receipt of the purchase of the hosting plan.
Next, please go to Namecheap Area Members, choose the Domains tab >> Manage Domains.
On the next page, click the Name Server tab. All you have to do is type both nameservers in the field, and then click Update.
After that, you just have to wait for propagation for a maximum of 2×24 hours.
Checklist for Hosting Migrations
- Move files to new hosting
- Redirect domains to new hosting
- Easy hosting migration
Managing a WordPress Website is Easy, Isn’t it?
All the steps you learn in this ebook are key to managing your WordPress website for the best results in an easy way. From speed, security to ease of migration. However, the above steps are certainly more optimal if supported with reliable hosting services. Because, all processes can be done quickly, easily, and safely.